
Adhesion is one of the most critical features of any coating. Adhesion is defined as the action or process of adhering (sticking) to a surface or object. Basically, how well does the new coating stick to either the substrate (the actual wood or other surface you are coating) or the previous layer (a.k.a. intercoat adhesion). Adhesion is critical to the protection and durability of a coating system and when it is poor, the results can be catastrophic. The cross-hatch test is an easy way to determine the success of your coating system.
What Is Adhesion and Why Does It Matter?
When using a Waterlox coating system or any other coating, one of the primary functions of that coating is to protect the surface underneath. If that coating does not adhere well to that surface, then its protection will only last as long as that coating remains in place. Basically, no matter how hard or waterproof a coating may be, it won’t protect anything if it doesn’t stay in place. For example, if you want to protect your counters from cutting, use a cutting board in between to protect the counter underneath. If you do the same cutting without the cutting board, the counter isn’t protected.
To further help explain; imagine a plastic tarp to keep rain off a roof. These are excellent weather barriers and they are nailed or screwed to the side or roof of the home to keep them in place. Simply laying a plastic tarp over the roof will keep out water as long as that tarp STAYS IN PLACE! You can help the tarp “adhere” to the roof by nailing down all four corners. However if a tear develops in the middle, damage will usually continue to spread until a fastener is reached. Meaning, eventually you’ll be left with just the four corners! Therefore, the more points that are nailed down, the better protected the surface is. The damage can spread until a point where it is better adhered to the surface. As in the image below, if you adhere at more points that can significantly reduce the effect of the damage.
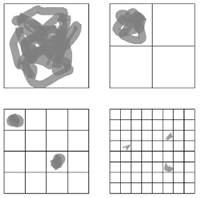
Figure 1: Adhesion Example
Using thousands of nails is impractical in this example. However, in the case of a liquid coating it would be ideal for nearly every single molecule to attach itself to the layer underneath. If your coating is well connected to the surface underneath, minor damage will be unlikely to spread or cause any appreciable weakening of the total coating. Yes, if the coating is damaged, it is susceptible to outside forces (water for example), but that damage is much better contained.
Cross-Hatch Test
The cross-hatch test is used all throughout the coatings world to determine the quality of adhesion. This is both adhesion to the substrate and adhesion between layers of a coating system. A coating may look very good over a larger surface, but the cross-hatch test is designed to determine how well each tiny section is adhered.
The Test
The objective of the test is to isolate small “islands” of coating on a surface and see how well the layers are adhered. To do this, a small grid is cut into the coating and even the substrate. This essentially isolates the full system (substrate and coating layers) into individual stacks. A piece of tape is then pressed firmly over the grid and removed quickly. There are kits with special blades and tapes for ASTM standards, but quick testing can be done with a razor blade, box cutter or other sharp blade and masking tape. You do not need to cut deep into the wood, but the objective is to cut through the entire coating layer. Also, smaller squares will be a more difficult test to pass and therefore a better check.
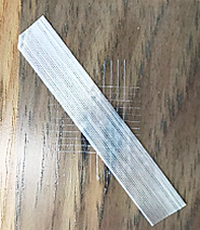
Figure 2: Cross-Hatch Test
Good Adhesion
When adhesion is good, there is a chemical or at least physical compatibility between the two surfaces. The molecules will either form actual chemical bonds or may also become so entangled (think like Velcro on a molecular level) with one another that they become extremely difficult to separate across the entire coated surface. When a cross-hatch test is done, the tape should come off relatively clean and the coating should appear intact over each section of the grid.
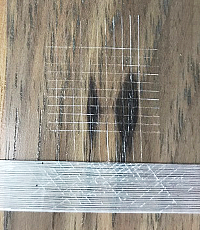
Figure 3: Good Adhesion
Some dust from the cuttings is in a nice clean grid on the tape and no squares are missing. Also, there are no rough edges on any of the small squares, meaning they are adhered from edge to edge. This shows that all of those small squares are individually and completely adhered to the layers underneath. There is no weak layer in the coating system.
Poor Adhesion
When adhesion is poor, there is a weak layer (or layers) in the coating system that may be the cause of major damage in the future. Over a large surface, the coating may appear very uniform and seem to adhere well (isn’t flaking off or bubbling), however when damaged, it may show that the coating is only loosely attached to the surface underneath. A cross-hatch test will reveal poor adhesion by peeling off entire squares of the grid and sometimes even beyond.
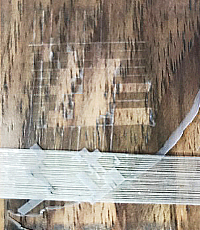
Figure 4: Poor Adhesion
In the above picture, you can see individual squares were lifted from the wood surface, and actually you can see where the coating is completely peeling off the wood. The coating looked good and dried well, however, if the weak layer were ever compromised, it could result in large sections of finish peeling off the surface. The above example is a particularly poor adhesion, but only 1 or 2 squares may pull off, or even rough edges along many of the squares will show that adhesion is less than perfect. The following section will explore some potential causes of poor adhesion and how to remedy them.
Solving Adhesion Problems
Some coatings are just not compatible and no amount of effort may be able to get a coating to adhere to a substrate or another coating. However, there may be ways to correct or improve poor adhesion.
- Use the correct products. First and foremost, make sure the products are intended for the substrate you are applying them to. Formulators can specifically make products for certain substrates, so make sure you are using wood coating products for wood surfaces. Some products may have further uses, but check with the manufacturer first.
- Check compatibility. There are many products that use different chemistries and solvents to achieve similar results. When mixing and matching products, check that putting one chemistry over another will not damage the previous layers. See the Types of Finishes paper for some additional information. Also, basically nothing is compatible over wax.
- Follow application and drying instructions. Apply products as intended based on the instructions. For instance, if they say to buff off all excess product then you should buff off all excess product. Too much product on the surface may have been the cause for a failed adhesion test. Also pay close attention to drying times. Most products will have a minimum drying time and some may vary depending on next steps. Also, some products (usually urethanes) will have additional steps that may be required if too much time has passed.
- Allow proper cure time. Make sure you follow proper drying times between applications, but also ensure that you allow proper time for final cure. An adhesion test may fail after 1 day, but pass after the recommended 7 days (for many products).
- Clean your surfaces well. Contaminants cannot only lead to a poor looking finish, but may also lead to poor adhesion. Cleaning with the proper solvents between coats is always a good idea and a thorough cleaning is always recommended when recoating an existing project.
- Abrade your surface (if necessary). Some coatings may require abrasion between coats to help the next layer adhere. This gives the surface a rougher profile that is easier to “grip”, again similar to the Velcro example used earlier.
Tips:
- Test each layer. When working with a new coating system test on a scrap piece of wood and test at each layer. This will help to identify where the adhesion problem is (which layer).
- Always check when mixing products from multiple manufacturers. Even if the technologies are very similar, it is always best to check compatibility and adhesion when using products from different manufacturers. Just because one brand’s water based urethane worked well over your stain, does not mean that all will behave the same.
- Recheck regularly. It doesn’t hurt to recheck your coating system regularly, especially if you are conducting tests on scrap pieces anyways. While not required on every project, this helps to ensure that nothing has changed with the products that you may not know about. With changing technologies and regulations, there may be slight changes that negatively affect adhesion.
- Use an ‘X’ instead of a grid for a quick test. See the Quick Adhesion Test: Cross-Scribe. This X test is quick and easy, however it is more difficult to interpret.